I really like blouses and shirts yet I do not sew many of them. Even though my last three posts are about blouses, don’t get fooled. I like sewing blouses, but I need variety in my sewing so when I make one blouse I go for the next best thing and by the time I get to making another blouse a lot of time goes by. But I really do like the ones I make and wear them a lot.
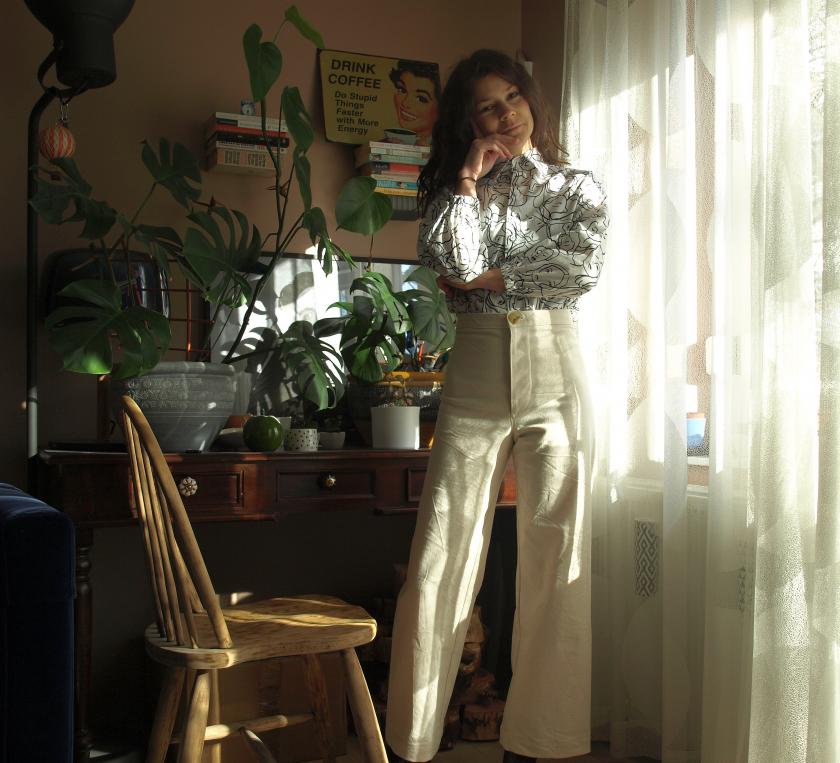
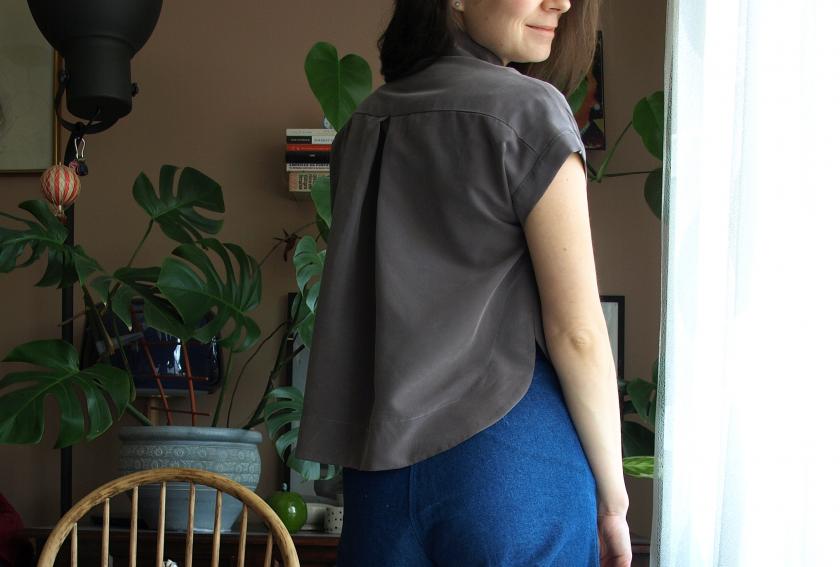
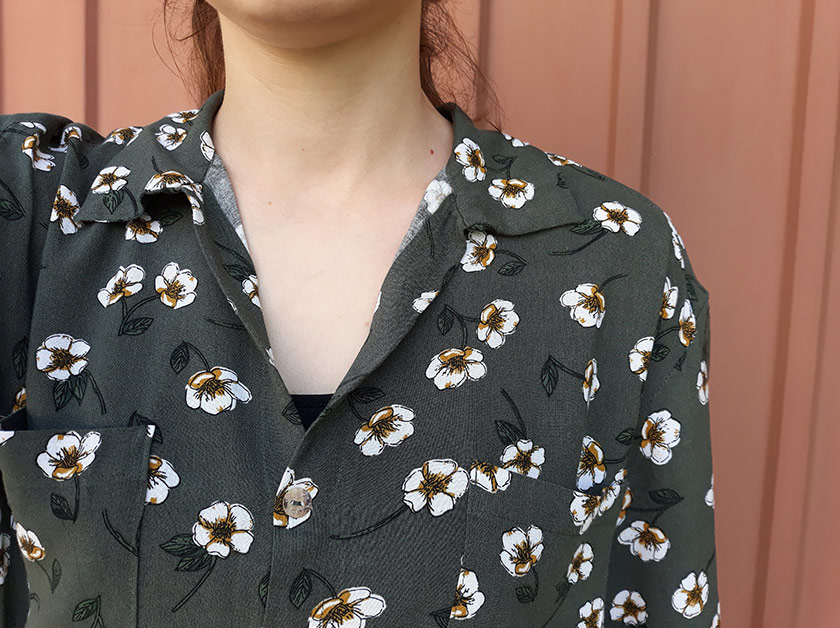
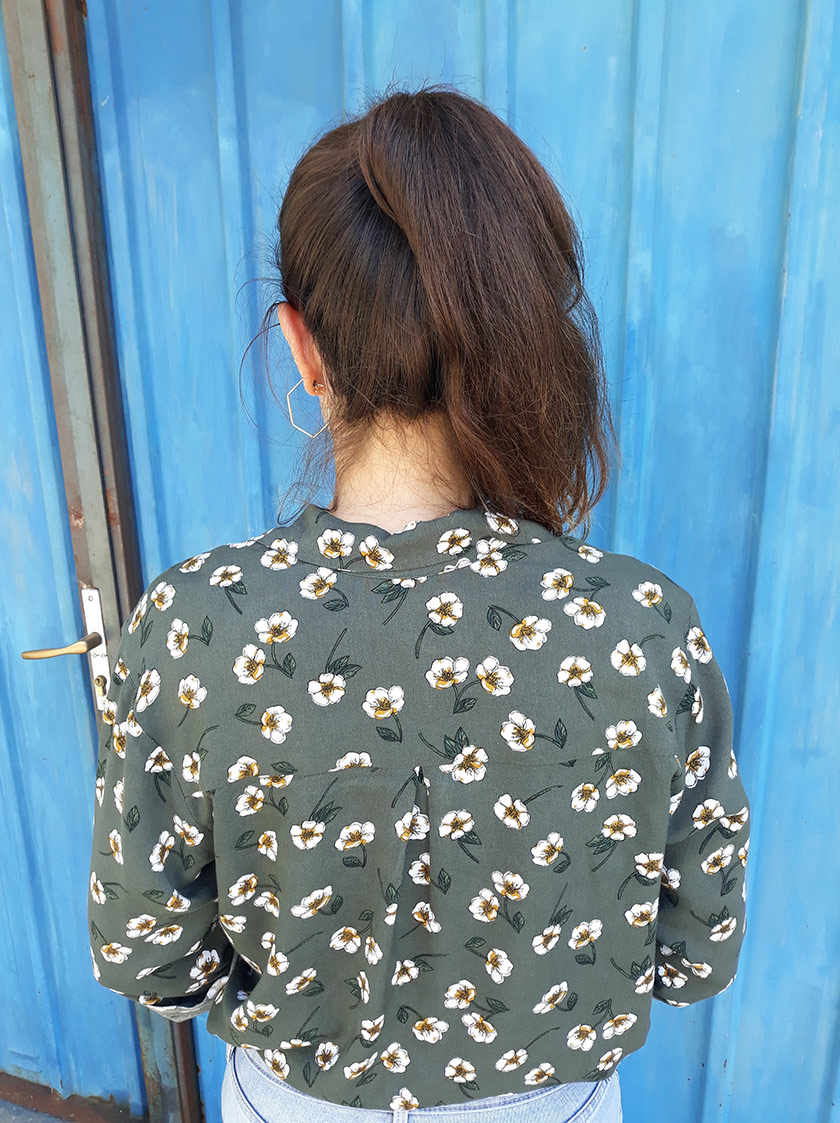
One of the blouses I made last spring during quarantine is the Sew Over It Libby blouse. I like this pattern a lot. I like the collar and the grown on sleeves. It somehow looks laid back while still being a blouse. Perfect!
The way this collar is constructed is new to me and it is a bit challenging. I am not sure if the part of the challenge had to do with the fabric choice, but the construction for sure needed a bit more of my attention that the regular collar construction. SOI have a good blog post about the construction of it which is a great extra help alongside the instructions. It is doable, but for me it took sometime to figure out what exactly I need to do. My recommendation is to read the instructions and blog post several times to really understand the steps and go slowly. My insides look a bit messy but I figure it makes no sense to be bothered by it since nobody will ever see it. Life is to short!
I sewed down the facing to the main fabric and the stitches are hidden under the collar. The facing was peeking out in few places before which was annoying and since the stitches are hidden below the collar it is the perfect little trick to make life (and wearing this blouse) easier.
I love the fabric and how bright and happy it is. I mentioned before but I will say it again – sewing made my fabric choices bolder and style so much more versatile and well, just better. That transformation is very welcome! Did sewing have the same effect for you?
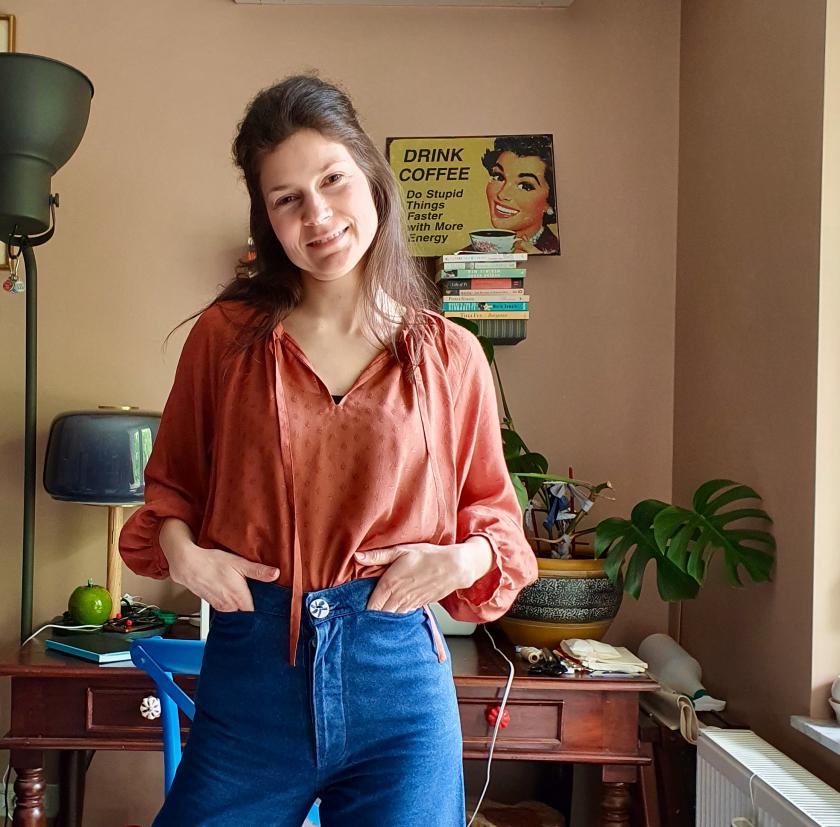
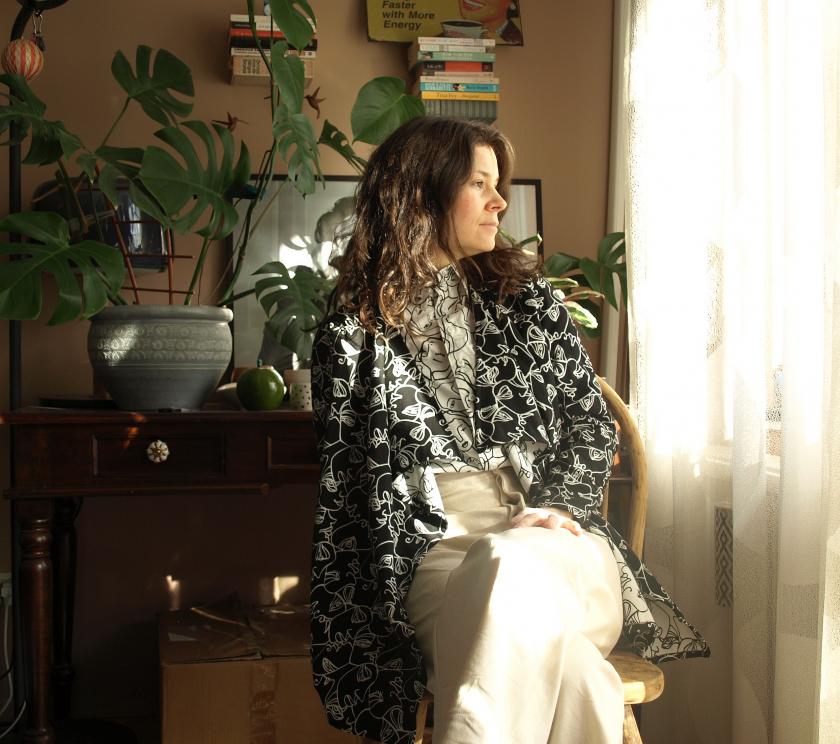
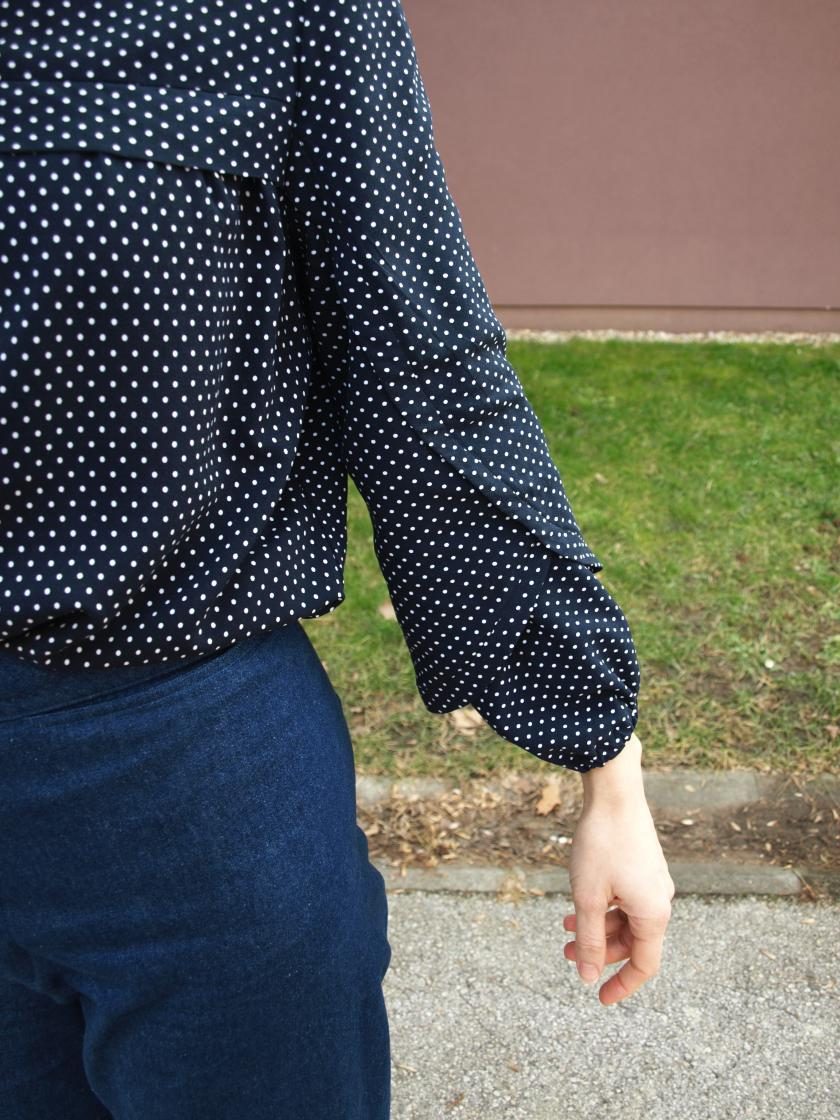
I looked at the Roscoe blouse pattern by True Bias for a long time thinking how it is the perfect breezy blouse. And it is exactly that!
I finally went and sewed it last spring during quarantine and it was love at first sight. And then after finishing the first version I went straight ahead and made two more. That’s how much I liked it.
The pattern is wide and has a lot of ease and that is exactly what makes this pattern so good – it is supposed to be big and breezy. It is really easy and fast to sew with no fastenings and with a bit of gathering around the neckline and sleeve hems. The sleeves are not set in sleeves but raglan style which makes this pattern easier and faster to assemble. The nice detail I like about it is it has long ties that go down from the neckline binding and they look equally good untied and tied into a bow. I mostly wear mine untied because I like the relaxed look of it. But with colder days ahead I will probably tie it more often.
The first version is this rust one made in Atelier Brunette viscose and it is dreamy. It is so soft and breezy and gives me such strong 70’s vibes. I made this one in size 2 which is maybe a bit too big for me, so with later versions I cut out the smallest size (size 0). The sleeves are long but do not reach all the way so the wrists are out. I do not mind that in a blouse although I do think the length is a bit weird. I did think of maybe shortening them but haven’t gotten to it yet. Will see how I feel after wearing it more this autumn.
The second version is again made out of a viscose and yes, again Atelier Brunette fabric. What can I say, I like their designs. I made this one in size 0 and shortened the sleeves so they get to above elbows. I like it much more with this sleeve length although it does mean it might not be really good for wearing in the colder days (at least for me). But I really like it made up in this fabric and I feel great when wearing it.
For the third version I stepped away from viscose and made it in a less flowy fabric. I used this colorful cotton (lawn? – it has been a while and I don’t remember the exact fabric components) and I love it. I did not have enough fabric to make it as long as the pattern suggests. This means I can’t really wear it tucked in but I like it like this as well. The sleeves are also shorter on this one and it is made in size 0. I also made the neck opening at the front a bit smaller so it does not gape. It is just at the right spot now to get it over my head, phew! I had this fabric for so long in my stash not knowing what to make from it and I think this blouse will give it the right kind of life.
Am I thinking of making more Roscoe blouses? Yes. Is there such thing like too many Roscoe blouses? No. This pattern is just too good for that to be true.
Did you make the Roscoe pattern? What do you think about it and do you like it as much as I do?
When I first saw this fabric I was in love and had to have it. I was very lucky to win one sewing challenge on Instagram at the same time meaning I got a voucher from Material Girl Laura. So you know what this girl did. She went online, redeemed the voucher, added a bit extra to get decent yardage and waited for the delivery. I loved the fabric so much I never felt like I had the right project for it. I knew I wanted a shirt but just could not decide on a pattern.
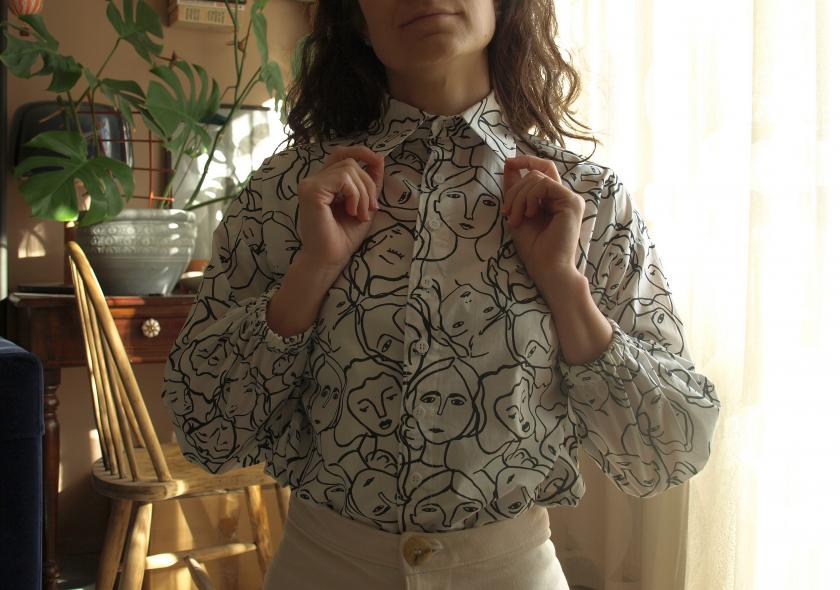
With time I decided to make it into a Kalle shirt by ClosetCase Patterns. Having done one recently (blogged here) and seeing many versions of it on Instagram I was confident this would be a good match. In fact, I dare to say this is one of the most popular fabric and pattern combos out there. When I posted about it on Instagram stories I got several replies from people saying they made a Kalle out of it. And even if you scroll down the hashtag you will see several of them made in this fabric. It was a sign!
I decided on a standard button placket and a popover collar. I prefer a popover collar over mandarin collar, just feels better suiting for a shirt.
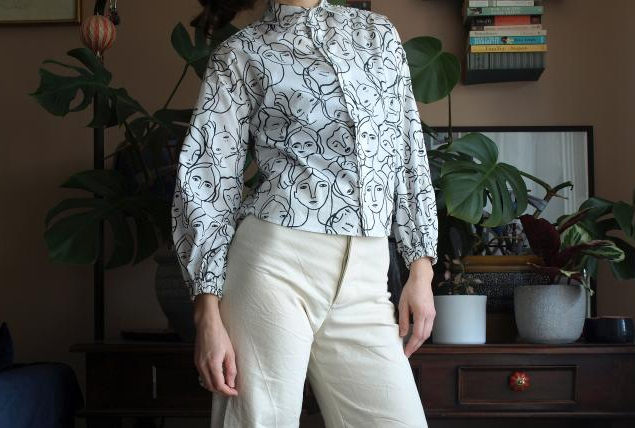
As for the buttons, I knew I wanted white ones but had several options in my stash. I did not have enough of the ones I decided to use so I went with a seethrough one on the collar stand (on the right in the photo below).
Deciding on button options
Like last time, construction and instructions were clear and straightforward. I decided to add sleeves to this one and did so with a bit of hacking and pattern frankensteining. I did not use sleeve cuff pieces that come with the pattern and attached the sleeve directly to the bodice. I used the Zadie jumpsuit long sleeve pattern piece. I already used this sleeve for two different pattern hacks but I am yet to use it for Zadie (one day). I first measured the sleeve opening on Kalle bodice and the Zadie sleeve top opening to see if they would fit. And measurements were almost perfect – the Zadie sleeve opening was bigger by about 1 cm so I just chopped that extra bit off while cutting.
I cut the sleeves as per pattern on top and went wider towards the bottom (kind of a bell shape) to get more volume. I did not have enough fabric left at that point to make them wider but they turned out good like this as well. I lengthened them also by about 5 cm and finished them at the hem with elastic – easy and quick.
I used the cropped version to cut it out but lengthened it so I could tuck it in high waisted pants. I wish I had cut it longer because it does ride up on the sides occasionally, but I will survive. I skipped the hem facing and finished it off with a satin bias binding that just looks a bit more luxurious.
I think this might be my new favorite shirt!
For anyone interested in the white pants and cardigan in the photos, you can click here and here to read more about them.
I love wearing shirts more than I love sewing them, but I definitely do not like ironing them. But that is the irony of life, ey? I love a crisp collar, buttons (yet buttonholes being probably one of the reasons why shirts are not my favorite from the garment sewing realm) and also how a shirt lifts up an outfit. I feel more “ready” when wearing one, isn’t that interesting? I just look down and think to myself – sh** I a wearing a shirt, I can do this!
I was looking at all the Kalle’s on Instagram and wanted to do my own version for a while. I finally decided to make it and use up this remnant I had from an earlier project I still have not blogged about (there seems to be more of these sneaky bastards by now, I should flex my fingers on the keyboard more). It is a viscose fabric I got a while ago in a local shop. It irons very well, let me tell you. If only all the shirts were like this (please?).
The pattern comes in three variations and I decided to make the cropped shirt. Other variations are tunic and dress. I made a dress before and love, love, love it (and wrote about it on Minerva Crafts blog). From back then I knew I needed a swayback adjustment so had this already adjusted on the pattern. This adjustment is a saver for me – you do not know how many bad fitting tops I made over the years before I found out about this little gem.
The hem is finished with a facing. This little piece of fabric gave me so much headache during construction. The problem was probably in the fact that I cut out the pattern sometime in April and had it lying on the table until October so this pattern piece stretched out. My bad, but boy did I lose my mind a few times. Sewed it two times with no luck and too many puckers so left it for a week. Then I came back to it and just figured I should lay the bodice piece over the facing and just cut the excess fabric from the facing that stretched out. This worked a treat and I could sew the two together with no problem. Victory. But this part is a bit tricky to sew, especially for any fabric that has a mind of its own (read: slippery).
This was my first time sewing a hidden button placket. This also boggled my mind for a while until I realized I was holding it the other way around than it is instructed. I have bright moments like this from time to time, don’t be jealous. Don’t use your head and you can have them, too. Easy peasy. Ok, back to the construction. The other parts of shirt construction are easy and straightforward. The instructions are great and there is also extra help on the CCP blog to hold your hand.
I realized that the collar stands really high on this pattern. I had not really noticed it from looking at the pictures but when I made it, it felt higher than I would like. At first, it felt strange. But after wearing it, it felt good and not constraining in any way. And there is always the option to wear it open and I like to have both options at hand.
The front bodice is really cropped so good thing I have several high waisted pants in my wardrobe by now so I have something to wear it with. I think they look really good together, don’t you think? I am interested to see if I can also combine it with a skirt, not sure I have seen a combo like that on the old gram so far.
I now have only the tunic variation of this pattern left untouched. I do have a fabric I want to make it in, I only need time. From my experience, it will take a long time to get it out and then a few months more to get it on the blog. But patience will bring me far, right?
I made a dream outfit which makes me smile like a dork. Persephone pants, Burda style magazine shirt and Gaia coat. I already blogged about the coat here, so I will not write much about it now, accept that I love it more than I love chocolate.
__________
Napravila sam outfit iz snova zbog kojeg se cerim kao bedak. Persephone hlače, Burda košulja i Gaia kaput. O kaputu sam već pisala ovdje, pa sada neću pisati o njemu osim što ću napomenuti da ga volim više od čokolade.
The perfect outfit/ savršeni outfit
I was eyeing the Persephone pants pattern by Anna Allen for a long time now but kept away from purchasing it. I have few other pants patterns similar to it in my stash already, so didn’t think I really needed this one. But I had terrible luck with all these other patterns and could not fit any of them. I was already close to crying. So I thought this one might be my light at the end of the tunnel since everyone was praising about it over on Instagram. So I did, I bought it and I am never going back. The fit is spot on and I am finally releasing all the frustration from other failed attempts of fitting pants. I made two muslins and decided the fit is perfect with size 2 at the waist graded to size 4 at hips. I also took the back seam in by 0.5 cm in because there was a bit of access fabric. I made the real thing out of 8oz denim from Minerva crafts. The denim tends to give with wear so maybe for my next denim pair I will size down to size 2 in hips and see how that woks. They fit fine but are a bit baggy after few wears. Nothing that would stop me from wearing them, just something that will help me make the second version better.
___________
Gledala sam kroj za Persephone hlače od Anna Allen dugo vremena, ali sam se suzdržavala od kupovine. Imam već nekoliko sličnih krojeva, pa nisam mislila da ne trebam i ovaj kroj. Ali sam s drugim krojevima imala loše iskustvo s podešavanjem tako da niti jedan kroj nije zaživio u formi hlača. Već sam bila na rubu suza. I onda sam pomislila da bi možda ovaj kroj mogao biti svijetlost na kraju tunela, obzirom da ga svi hvale na Instagramu. I jesam, kupila sam ga i više se neću vraćati nazad. Pristaju mi kao salivene i napokon otpuštam frustraciju koju sam nakupila iz svih promašaja s drugim krojevima. Napravila sam dvije testne verzije i vidjela da mi paše veličina 2 u struku prošireno na veličinu 4 u kukovima. Dodatno sam unjela stražnji šav za 0.5 cm da se riješim viška tkanine u tom području. Hlače sam napravila u 8oz traperu iz Minerva crafts dućana. Traper se širi s nošenjem pa možda za idući par ostanem u veličini 2 i u kukovima. I ovako dobro pristaju samo se s nošenjem malo razvuku. Ništa što bi me spriječilo da ih nosim, ali nešto što će mi pomoći kod izrade idućeg para da budu još bolje.
I also used a memade clay button / iskoristila sam i svoj keramički gumb
The reason I am pointing at the button above is because it is memade out of clay and I blogged about that process here.
___________
Razlog zašto pokazujem na gumb je taj što sam i njega napravila od keramike, a o tome sam ranije pisala ovdje.
2nd muslin
To be open and not talk about successes only, I did make a mistake while sewing. I was so thrilled on finishing them and when I had one last button to go at the waist I went in and sewed the buttonhole only to realise I did in on the wrong side of the waist (part of waist where the button goes). Thankfully, this mistake did not mean I had too many reparations to do, or better yet, any at all (good thing is I did not cut into the buttonhole yet!). I only put the button over it and sewed a new buttonhole on the top side of the waistband. This means that now if you look closely, like in the picture bellow, you can see part of that useless buttonhole, but as it would be weird for anyone to look that closely there, I think I am fine.
___________
Da budem skroz iskrena i ne pišem samo o uspjesima, na hlačama sam napravila jednu vidljivu grešku. Bila sam toliko uzbuđena da ih dovršim i kada sam bila na zadnjem gumbu sašila sam rupu za gumb i shvatila da sam ju uspjela našiti na krivoj strani pojasa (donji dio pojasa na koji ide gumb). Srećom nisam već zarezala u rupu pa nisam trebala ništa prepravljati, već sam samo našila gumb preko toga. Rupu za gumb sam našila na drugu stranu pojasa i ta da. Kad se bolje pogleda vidi se beskorisna rupa za gumbe s donje strane pojasa (na slici dolje), ali kako nitko normalan neće s pretjeranom pozornošću gledati u taj predio hlača mislim da sam ok.
or maybe you cannot see it in this picture after all 🙂 / ili ipak ne možete vidjeti tu grešku ni na ovoj slici 🙂
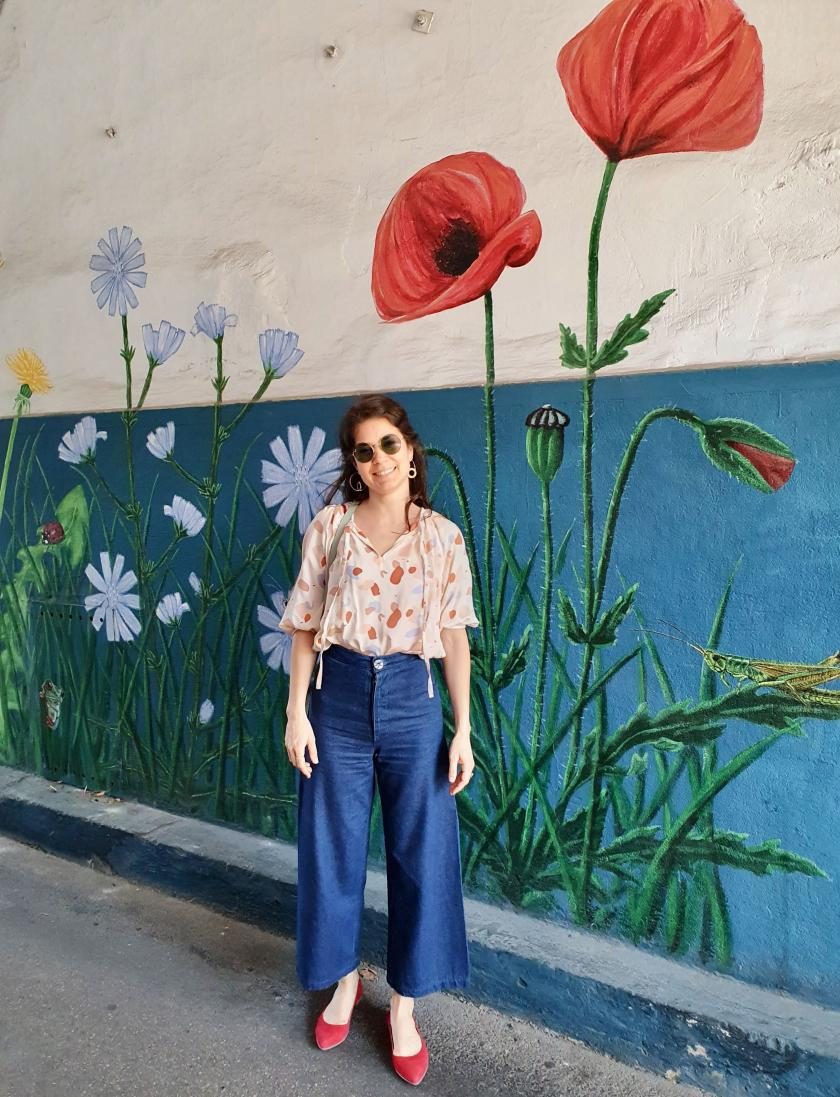
The Burda style shirt is from magazine issue 4/2018. The pattern is actually a jumpsuit, but I hacked it into a shirt. The jumpsuit looks perfect though, so I might do that one as well at one point. The pattern has many lovely details and when I saw Vesna of @kelerabeus make the jumpsuit I was determined to make it as well. Fabric restrictions made me stick to the shirt only, but I love it. The pattern has double sleeve action which caught my eye straight away. I scratched my head a lot with this one (as I always do with Burda), so Vesna was so great to help and send me her version of Serbian instructions, because the German ones were not cutting it. Thank you Vesna!
_______________
Košulja je iz Burda časopisa broj 4/2018. Originalno je to kroj za kombinezon, ali sam ga izradila kao košulju. Kombinezon je odličan, pa u nekom trenutku možda i njega napravim. Kroj ima odlične detalje i kada sam vidjela Vesnin (@kelerabeus) kombinezon znala sam da ga i ja želim. Kako sam bila ograničena s količinom materijala napravila sam košulju, ali sam prezadovoljna. Kroj ima dupli rukav koji me odmah privukao. Ovaj kroj me dosta izazvao s uputama (kao i svaki drugi Burdin kroj), ali je Vesna super i poslala mi je srpsku verziju uputa, pošto mi njemačke upute jednostavno nisu bile od nikakve koristi. Hvala Vesna!
The fabric I used is a viscose with small polka dots I got at a local shop. It is a great option for the double sleeve. It pairs well with jeans and it was meant to be worn with denim Persephone pants, at last in my opinion. What do you think?
_____________
Tkanina je viskoza sa sitnim točkicama, a nabavila sam ju u lokalnom dućanu. Viskoza je odlična opcija za ovaj dupli rukav. Super je u kombinaciji s trapericama i stvorena je za Persephone hlače, barem po mojem mišljenju. Što vi mislite?
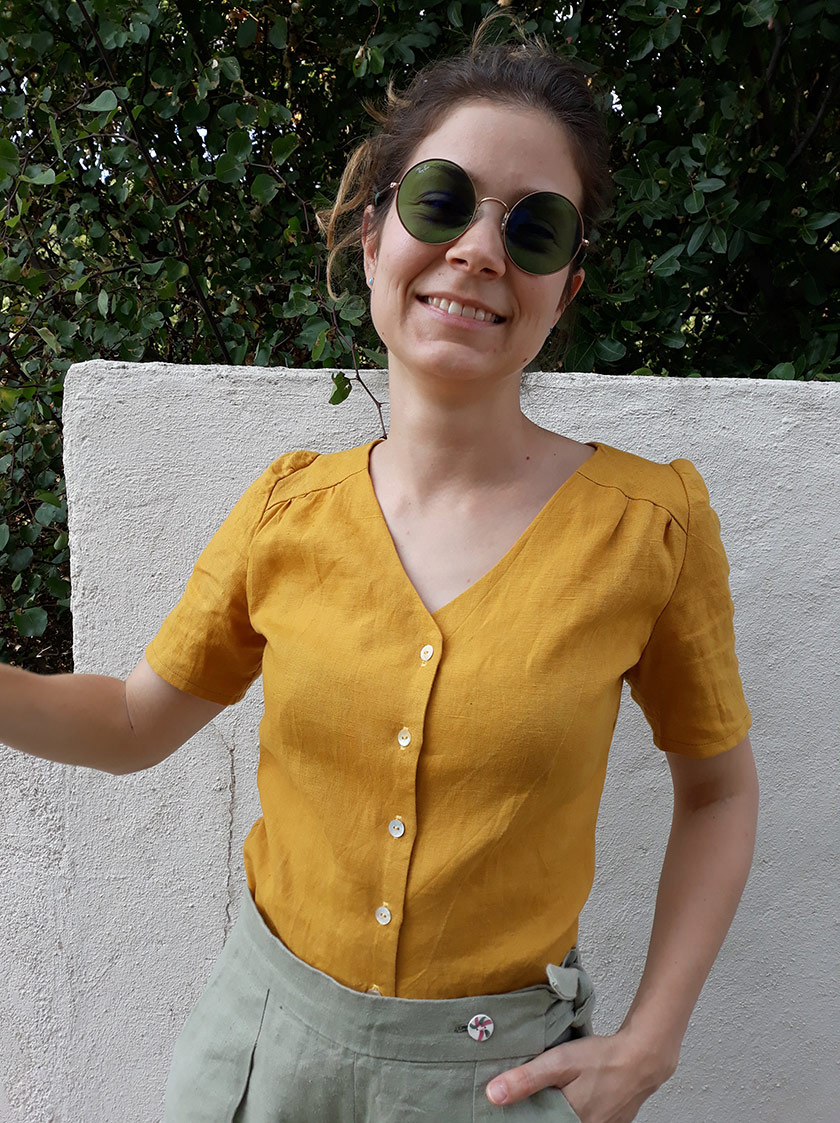
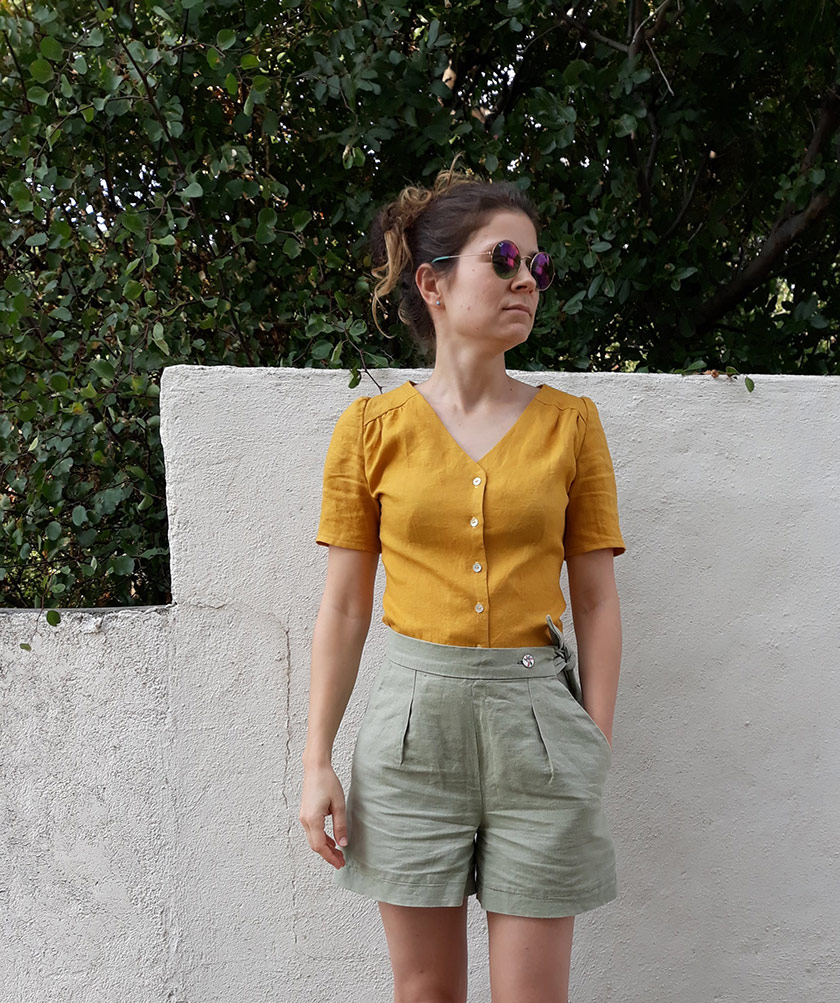
The Kew dress by Nina Lee Patterns is a real beauty and I was eyeing it ever since it came out. I was not sure it was really me (although it is my dream wardrobe, just not sure I would wear it as much). So I waited. And waited. And one day I caved and got the pattern. That is how it usually works 😊
________
Kew haljina od Nina Lee Patterns je prava ljepotica i dugo sam ju mjerkala. Nisam bila sigurna da je u potpunosti moj stil (iako tako izgleda moja garderoba iz snova, samo nisam bila sigurna da bi ju u stvarnosti dovoljno nosila). I tako sam čekala. I čekala. Sve dok jednog dana nisam popustila i kupila kroj. Tako to kod mene obično ide 😊
I thought about making the dress, but as I am really into separates recently I decided to do the top first and check the fit while I am at it. Top version is not included in the pattern but it is so easy to make. You just measure how long you want your top to be and make the bodice that much longer (with extra 2 cm or so for the hem). Easy peasy.
__________
Razmišljala sam napraviti haljinu, ali kako sam u zadnje vrijeme totalno luda za majicama odlučila sam napraviti top verziju i usput provjeriti jesu li potrebne neke preinake. Top verzija nije uključena u kroj ali je to jednostavno napraviti. Samo trebate izmjeriti koje dužine želite majicu i za toliko produžite kroj gornjeg dijela (plus otprilike 2 centimetra za dovršiti rub). Jednostavnije ne može.
Combined here with Flint pants pattern by Megan Nielsen / ovdje u kombinaciji s krojem hlača Flint od Megan Nielsen
Now the fit – it was ok. That means that it was good but I had some gaping in the back. The back bodice was a bit big in the shoulder area so the neckline stood up. Not good. But I only noticed that when the facing was already sewn and the top was basically done apart from the hem. So I debated with my inner self weather I prefer to take it apart, take it in, redo the facing and stitch it all back together or I want to go the lazy route and try taking it in somehow. Guess which route I choose. Yes, lazy as one can be. So, I opted to make the back darts longer and sewed them all the way up to about 2 cm before the facing and bodice seam. This helped a bit but not 100% and there was still some gaping in the middle back. So finally I added a big dart in the middle and caught both bodice and facing in it. That gave perfect results and it now fits perfectly. This also helped with the front and raised the neckline a bit which I like. And it does not look like a butcher’s work at all and it actually gives a fun detail to the back.
_______________
Kroj haljine mi je odgovarao, ali bila je potrebna manja intervencija. Sve je dobro pristajalo, ali kada sam praktički bila gotova sa svim osim s rubom, primijetila sam da su leđa prevelika i da majica strši u zrak kod vrata. A to nikako nije dobro. U tom trenutku sam debatirala bi li radije rastavila majicu, unjela ju i ponovo zašila nazad ili bi odabrala lijenu verziju i u ovom ju stadiju nekako unjela. Probajte pogoditi za što sam se odlučila. I tako sam išla lijenom rutom (pogodili ste, jel da?) i za početak sam produžila stražnje ušivke prema gore do otprilike 2 cm prije šava. To je malo pomoglo ali nije skroz riješilo problem. Onda sam na sredinu stavila veći ušivak s kojim sam uhvatila glavnu tkaninu i postavu i to je bilo to. Sada majica pristaje odlično, a to je čak i malo podiglo prednji izrez što mi se sviđa. I obzirom da sam išla ljenijom rutom na kraju rezultat uopće nije neuredan i još daje zanimljiv detalj na leđima. Pobjeda.
I omitted the front darts since the fit without them is perfect and with them it was too snug. I hemmed the top after making buttonholes and sewed on the buttons to make it even. I plan to wear it tucked in so wanted to make it a bit longer. That way I can wear it with high waisted trousers or skirts.
________
Prednje ušivke nisam napravila jer nisu bili potrebni. Kada sam ih ušila majica je bila preuska, pa sam se odlučila izbaciti ih iz kroja. Rub sam dovršila nakon izrade rupica za gumbe i postavljanja gumba da bi ga mogla uredno poravnati. Plan mi je nositi ju zataknutu u hlače ili šoseve visokog struka pa sam ju napravila malo dužom.
And the colour of that fabric is everything! It is linen (with viscose I think) and it is gorgeous. I couldn’t leave without it when I saw it in a local shop. It is perfect for this time of year.
_________
Boja tkanine je sve što sam ikad sanjala! To je lan (mislim da ima i malo viskoze) i predivan je. Nisam mogla izići iz dućana bez njega. Boja je odlična za ovo doba godine.
Combined here with Erin skirt pattern by Sew Over It / u kombinaciji s krojem šosa Erin od Sew Over It
Next I plan to make a dress version (all three of them!) and also the skirt. I think they all look great paired with the right fabric. And my wardrobe is more cheerful once again with this new garment, so yey!
Iduće planiram napraviti haljinu (sve tri verzije zapravo!) ali i šos. Mislim da sve verzije kroja izgledaju predivno kada se kombiniraju s pravom tkaninom. A moj ormar je još malo sretniji sa sunčanom bojom tako da – jej!
The second pattern up for review from the Sew Over It’s City Break Capsule Wardrobe E-book is the Alex shirt. This pattern comes in both shirt and dress length. Both are great for dreamy flowy fabrics and make existing whole in my wardrobe significantly smaller.
Drugi kroj na redu za recenziju iz City Break Capsule Wardrobe E-book od Sew Over It je Alex košulja. Kroj dolazi u dvije verzije – košulja ili košulja-haljina. Obje verzije su odlične za lepršave, lagane tkanine i obje odlično nadopunjuju moju garderobu.
This pattern is great for the first shirt because it does not have a collar stand. You attach the collar directly to the body of the shirt so the construction is easier and faster, but you still get to have a taste of the collar construction. Another thing I loved making is the back yoke construction. I needed some head scratching because I just could not get my head around it at first as I never sewed one before. Some trial and error (read unpicking seams) and I got it right. It felt like I won an argument 😊 Always so good! It was an argument with myself (not the pattern) but it still counts.
Ako se po prvi put upuštate u šivanje košulje kao i ja, ovaj kroj je odličan jer ima samo kragnu (gornji preklopni dio) bez ovratnika (donji uspravni dio). Zbog toga je puno jednostavniji i brži za šivanje, a na kraju opet dobijete djelomično iskustvo izrade kragne. Druga stvar koja mi se svidjela kod izrade košulje je sastavljanje ramenice (ramenog dijela košulje na stražnjoj strani). Trebalo je par pokušaja da pogodim pravilno sastavljanje pošto sam i to šivala prvi put, ali nakon par pokušaja i pogrešaka (i korištenja paralice) sam uspjela. Kao da sam pobijedila u raspravi. Sama sa sobom, a ne s krojem. Ali bitno da sam pobijedila 😊
collar from the front / kragna bez ovratnikaback yoke detail / detalj ramenice
It was also my first time sewing patch pockets. I am happy with how they came out. One looks better than the other but I do not think anyone would ever notice but me. Patch pockets are so easy and make a shirt that more interesting in my opinion. I am glad I have that one under my belt and I already used it on many other projects (like on my coat which I blogged about here).
Također sam prvi puta šivala našivene džepove i zadovoljna sam kako su ispali. Jedan izgleda puno bolje od drugog, ali mislim da to ionako nitko neće vidjeti osim mene. Našiveni džepovi su toliko lagani, a baš dobro izgledaju na košuljama. Tako da mi je drago da sad imam i to iskustvo i već sam ih šivala i na nekoliko komada nakon ove košulje (recimo na kaputu o kojem sam već pisala ovdje).
The pattern has a button placket for closure in the front. I was in a bit of a rush (and just plane lazy) so I went for the ultimate lazy shortcut to date: fake button placket. I made the button placket as regular but hand sewed the buttons through both sides of the placket in place. There are no buttonholes (see what I meant with lazy shortcut?). The shirt does not open but as it is not supposed to be buttoned up all the way to the collar there is plenty of room to get it over my head. It looks a bit silly when I try to get it on without making any creases in the fabric, but nobody sees me getting dressed anyway so…..
Kroj ima lajsnu s gumbima i rupicama za gumbe za zakopčavanje. Pošto sam bila u žurbi (ili jednostavno lijena) odlučila sam se a ultimativni lijeni prečac: lažna lajsna za kopčanje. Napravila sam ju regularno kako se radi klasična, smo što nisam gumbe našila na jednu stranu lajsne, već sam ih prošila kroz obje lajsne, a rupice za gumbe uopće nisam radila (vidite što sam mislila pod lijenim prečacem?). Košulja se onda ne otkopčava ali je dovoljno otvorena da ju mogu prevući preko glave. Malo je smiješno kad ju oblačim bez da ju zgužvam, ali to ionako nitko ne vidi.
The only thing I do not particularly like is the slightly dropped shoulder and the over-sized look. When I looked at samples and all other Alexes out there I did like it, but not on me as it turns out. Maybe it is the fabric I used, but I feel a bit lost in there. Maybe even granny due to the fabric pattern, but then again, it is never bad to show a bit of granny glam once in a while. I mostly wore it under a cardigan in winter but now I wear it tucked into jeans and that looks way better. I think that I will take it in for future ones I make. I toyed with it a bit and I would not take it in the sides but would take about 2-3 centimeters form the center of the front and back bodice pieces. This takes the shoulders in but still gives it a relaxed look. I will report back if that was a good idea.
Jedino što mi se ne sviđa je spušteni rukav tj. spušteni šav rukava i prevelik izgled košulje. Dok sam gledala uzorke kroja i ostale već izrađene Alexe to mi nije smetalo, ali mi smeta na meni. Možda je zbog tkanine koju sam koristila, ali nekako si izgledam izgubljeno kao u prevelikoj košulji. Zimi sam ju nosila ispod dugih rukava, ali sam ju sada na proljeće počela nositi utaknutu u hlače i to mi se sviđa. Za ubuduće ću ju probati suziti, ali ne na bočnom šavu, već ću maknuti 2-3 centimetra iz sredine prednjeg i stražnjeg bloka. Tako pomaknem šav rukava i ramena prema unutra, a da i dalje imam opušteni izgled košulje. Ako eksperiment uspije podijelit ću ga na blogu.
I see many more Alexes hanging in my closet and I already have some fabrics lined up for sewing. I hope I will whip them up sometime soon.
Vidim još puno Alexa u svom ormaru i već imam nekoliko tkanina koje čekaju svoj red za šivanje. Nadam se da ću ih stići sašiti nekad uskoro.